Showing posts with label Technique. Show all posts

Wednesday, January 30, 2019

Blast Off - Love you to the Moon and Back!

Hello and happy Wednesday!
Today I'd like to share a clean but layered card I made
using a fabby Kraftin' Kimmie Stamps set 
called BLAST OFF and a galaxy background
(made with distress oxide inks). This stamp set is perfect
for that fun technique.  I wish you could see the 
different colors behind the dark overall color
a little better in the photo - it's so pretty IRL!

I colored this sweet spaceship image during a video on 
Now I can share the finished card using that image.
If you're interested in seeing the video you can click here
(if you aren't a member - just ask to join).

This super duper adorable stamp set also has two more main images
of a boy astronaut and his astronaut pup with a couple
more fun sentiments.  AND guess what... it's on SALE this week
at Kraftin' Kimmie Stamps for 40% off.  Wow - that's a great deal! 
Need I say more - hehe!  

I'm entering this card in the following challenges:
I was inspired by the fun bright colors, the layers and the dark
background in the photo below. My card fits the Clean and Layered style. 

Thanks so much for stopping in to visit me today! Hugs! D

Saturday, July 23, 2016

Kraftin' Kimmie Challenge #341 - Summer {Buds and Blooms & Butterfly Dreams}

Happy weekend crafty peeps! 
We have an exciting weekend planned. 
My first niece is getting married today!! 
So amazing and exciting and a little sad that 
she is already old enough to be married! 
Also my son got home last night for a week's visit 
so we will be cramming in as much fun as we can
over the next few days with him. 

Today a new Saturday challenge begins at 
KRAFTIN' KIMMIE challenges 
and the theme this week is  "SUMMER".

Oh how perfect is that?!  Our summer so far
has been very mild - especially for July.  

I made this card to share with you today using
clear stamp sets - take a look:

Once again I used the spotlighting technique
by only coloring some portion of the images 
so they really stand out.  Isn't this color 
combo just lovely?  It sure feels summery to me!

I'd like to enter this card in the following challenges:
Simon Says Stamp Wednesday Challenges -Things with Wings
Dragonfly Dreams Challenges "Anything Goes"
Outdoors at Sweet Stampin' Challenges
Creative Moments challenges #98 "Anything Goes"

Come play along with us this week! 
I can't wait to see what you make!
Hugs! D

Saturday, November 21, 2015

Kraftin' Kimmie Challenge #307 (Embossing) and MyTime to Craft #309 (Let it Snow)

Happy Saturday friends! 
Today I get the pleasure of combining two of my DT 
challenges into one post :o).  
Challenge #307 at KRAFTIN' KIMMIE  is "Embossing"
and Challenge #309  at MY TIME TO CRAFT is "Let it Snow".

Here's my card featuring one of the adorable winter-lovin' critters 
from the stamp set called "Ice, Ice Baby" by Kraftin' Kimmie Stamps,
with a dry embossed panel of snowflakes.

Dry embossing is one of my favorite techniques to use. 
I have a LOT of embossing folders in my crafty stash. They are a 
great alternative to patterned papers sometimes. 

Another fun technique that I've showcased here is a spinner card.
There is a tutorial on how I did this on the Kraftin' Kimmie 
challenge blog.  Check it out if you would like to learn more about it.

I'd also like to enter this card in the following challenges:
Papertake Weekly - Let it Snow
ABC Christmas Challenges - W for Wild Things
4 Crafty Chicks # 273 - Inspired by a Song ("Baby it's Cold Outside")

HEY...before I forget...the FRUGAL FRIDAY SALES
are up and there are some amazing deals to be had.  Go
check out the main blog page to see the specials.

Thanks so much for stopping by! I hope that you will play
along with us this week and show your mad embossing skills!
We always enjoy your creations so be sure to submit them
so you can have a chance to WIN a $20 gift card to the Shop!
In keeping in line with the rest of our challenges at KK,
we will be drawing one winner per month from all Saturday Challenge
entries to win a $20 gift card! You can enter as many times per month 
as you'd like! So go get krafty and join us soon! 
Til next time...hugs and happy kraftin'! D

Monday, August 17, 2015

Kraftin' Kimmie Krafty Tips and Tutes - Photo tutorial of bokeh technique (10 easy steps)

Hello krafty friends!
I'm happy you are here to visit me today as it's my turn to 
present the Krafty Tips and Tutes.  I've chosen to make a 
photo tutorial on the bokeh technique for you this week.

WARNING - this is very photo intensive as I've not had much luck
at all with videos of late. But it should be pretty easy to follow. 
Additional warning - a couple of my photos are blurry
as I was trying to take the pic with my left hand while
still demonstrating the step with my right - LOL.
Boy did I miss my daughter that day for her help!!

Anyhoo..... first let me show you the finished card 
and then I'll start into the steps on how to make it.
Stamp from "You're a Scream" by Kraftin' Kimmie

Products you need for this project are:
watercolor paper or glossy cardstock 
paint brushes and water & papertowels
masking/stencil/painter's tape
watercolor paints or distress/regular ink refills
ink pads (distress or regular) and white craft (or StazOn) 
circle template, sponges or sponge dauber, 
solid circle stamp in a couple sizes
heat gun (preferable if you don't want to wait for project to dry)

Step One:
Start with a piece of watercolor paper.  You can also use
glossy cardstock but today I'm using watercolor paper.  I'm 
using a panel sized 5 x 5 1/2" which I will trim down when I'm done.
It's really helpful to secure your paper to the surface you're 
working on. I'm using painter's masking tape. The paper will
buckle a bit as you are coloring it so the tape helps to keep it flat
and in place.  You can put a piece of wax paper under your panel 
to help with the watercolor seep-through that might occur 
(if you're kind of messy like I am - LOL).  

Step TWO:
Prepare your watercolor supplies.
I used 3 different shades of blue on my panel - 
Pool Party, Baja Breeze and Island Indigo.
The amount of ink you use depends on how deep you
want the color to be on the panel.  Typically I use between
5 and 8 drops of ink one little well of this paint tray.  


Step THREE:
Prepare your panel by using just clear water - give it a 
good generous coating all over.

Step FOUR:
Now start adding your base color(s)

I first swoosh the lightest ink around and then go back
and swoosh in some more of the darker shade in just a few
areas. It's very subtle but does create more depth in the panel.

Step FIVE:
When you are happy with the base colors, dab it off with a
paper towel (see how messy I am :o) ? ).

Step SIX:
Using a solid circle stamp or two (or circle stencil) add 
some darker spots to the panel.  Note:  I save the insides of my 
stamps that have pop out middles for this - works great 
as it's kind of hard to find solid circle stamps. 

I first used a larger circle rubber stamp in a few areas on
the panel.  Because the paper is a bit dry the ink will appear
appear kind of dark so I will use the deeper shade of blue that 
I made and softly blur the circle and shape and edges later.
  Then I randomly stamped the smaller circle around the
panel to fill in the spaces a bit more and add depth to the base.

Then I take the lighter shade of blue and 
give it a final wash-over to blur and blend the circles.

Step SEVEN:
Once again dab off with a paper towel and then if you 
have a heat gun use it to dry the panel for the next steps.
Note: if you don't have a heat gun you will want to wait 
about an hour before you start the next steps (longer if
you're using glossy cardstock). 

Here's a photo of the different finishes you will get 
with a watercolor panel (left) and glossy cardstock (right)


Step EIGHT:
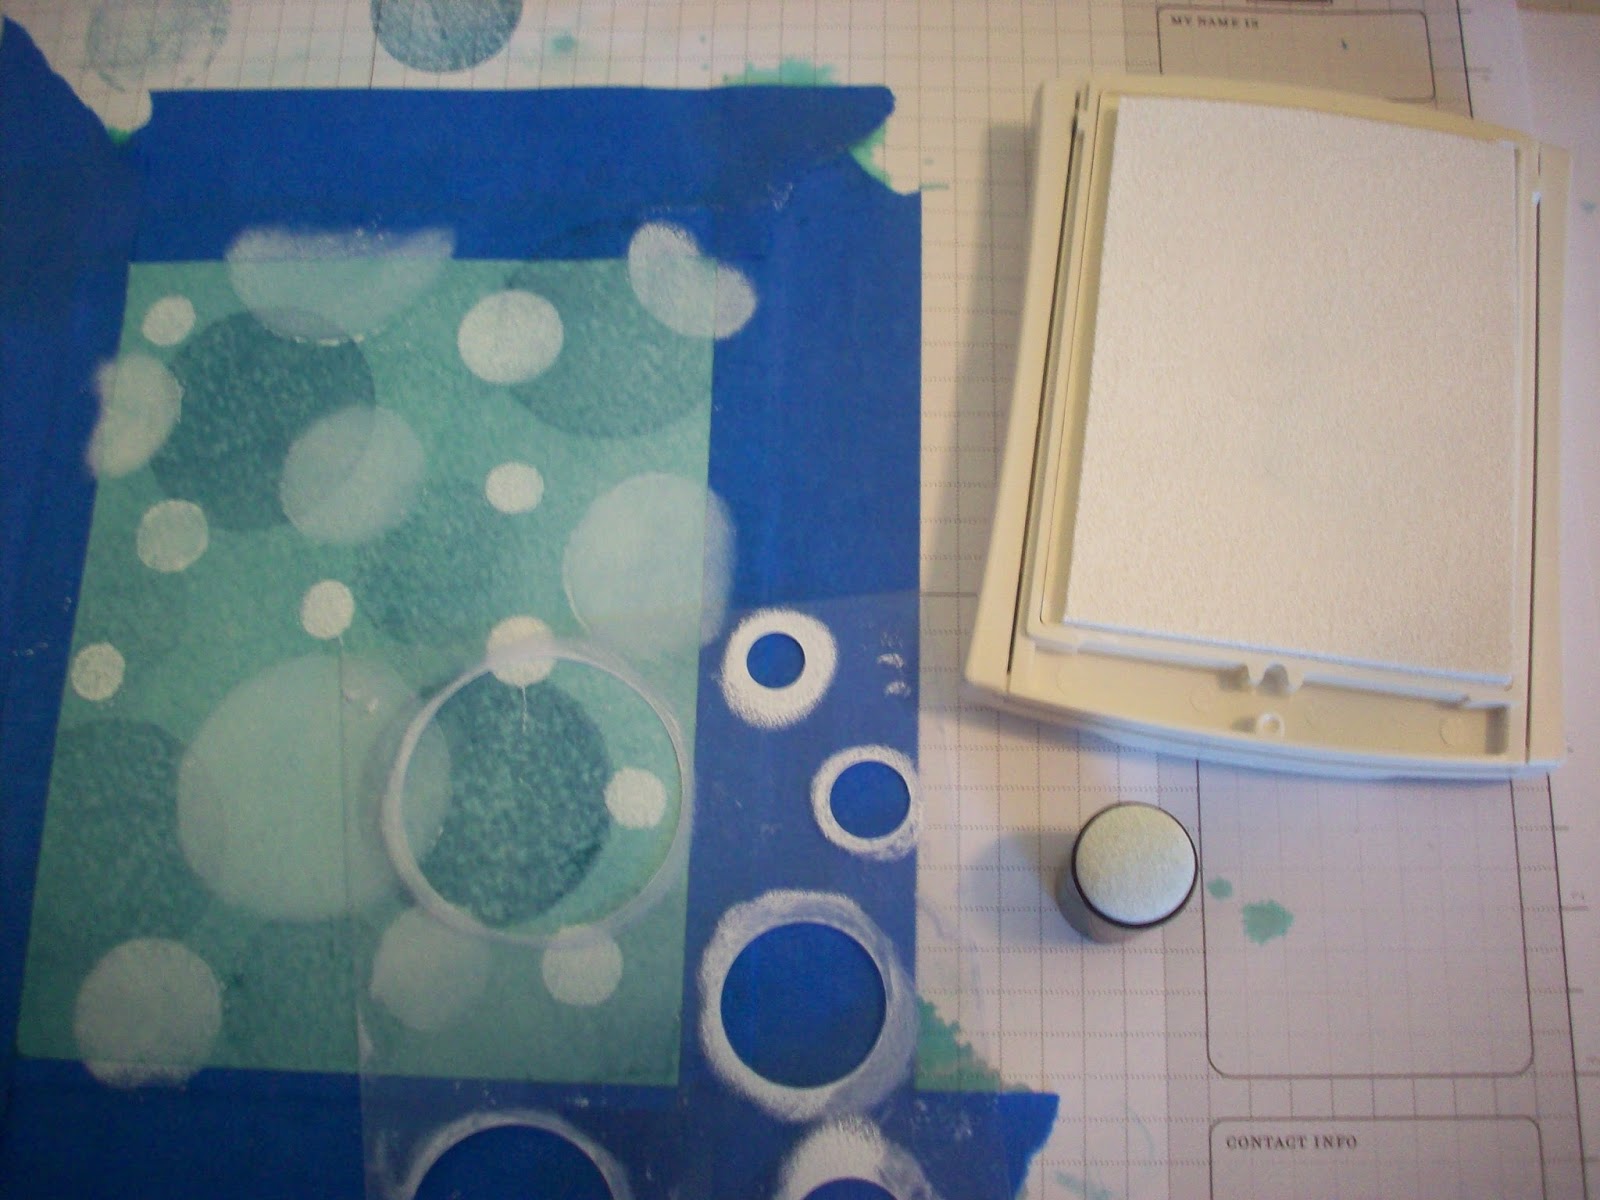
Now we are going to add the bokeh effect dots 
with white craft ink, a sponge dauber and a circle stencil.
I've made my own circle stencil using various sizes of
circle punches in a random pattern and a clear window
sheet from some product packaging.  You can also use the end
of a pencil eraser, a sponge dauber, or a circle stamp for this step.


Tip: I found it works best if you start at one end (corner or side)
and work away from it as you fill in the circles as craft ink
is pretty sticky and you can accidentally pick up the edges from the 
one before and and mess up your pattern.  

To create the bokeh effect you will fill in the different sizes of 
circles around the panel. The larger circles should have less ink
on them and be a bit blurred as they are the farthest out of focus
and the smallest circles will have the most saturated color 
(because they would be closest in the photo as spots of light).

Step NINE:
Craft ink is very sticky and takes a long time to dry
(even on watercolor paper) so I use a heat gun again (I'll 
spare you that boring picture - hehe) to set the color again. 
StazOn ink will dry much faster but I like the results I get with the craft ink.  

When you've dried it you can take off your masking.  
and you get something that looks like this

Step TEN:
If you've done a really good job of masking (or not been
really messy like me) you can trim the panel to leave a small
white edge around it.  I have taken the pane and trimmed it down 
to 4" x 5 1/4" with my paper cutter to get this

Final Step(s):
Take your bokeh panel and add your images (or sentiments)
and adhere it to a mat and/or your card base to finish your project
like I did with the yellow cardstock.  Then add some other embellies
as you wish - such as the Doodlebug sprinkles (available in the 
KK shop) and a wooden sentiment for extra pop to the project.
Ta Dah - DONE!!! Easy peasy - right ?

Thanks so much for sticking with me to see my tutorial.
I hope it was clear and easy to follow and that I've inspired 
you to go get inky and give it a try too!
Til next time...hugs and happy kraftin'! D

Sunday, July 12, 2015

Catch the Bug Challenges - Christmas in July {Sketch}

Hello sweet friends and followers!
It's Day 2 of the Christmas In July  challenges
at Catch the Bug Challenges!!!
Today we have a sketch for you to try, and it's a goodie
take a look:


For  my card today I've added a panel using the bokeh technique
and some non-traditional colors (my favorite to use on Chrismas
cards) with "Mini Set - Winter Bears".  I received this fabulous set
last year when I won the 2014 Christmas Chaos challenges.
And that is why, my friends I have also been enjoying the
past 3 months as a guest designer for Bugaboo Stamps!


Here's a look at the inside too and another of the images 
and a sentiment to finish it all up.  Pretty cute - huh??


I'd like to enter this card in the following challenges:
Come and Get it Challenges - Christmas in July
4 Crafty Chicks #254- Christmas in July
Sweet Stampin' Challenges - Christmas in July
Winter Wonderland - Have a Beary Merry Christmas

I sure hope that you will join us this week for 
Christmas in July.  Each day of this week long event
there is a new challenge to help you get your Christmas cards
started.  You also have a chance at a daily prize as well as 
for the GRAND PRIZE for playing along with all of the 
challenges.  More details are on the main blog - please go see.
Check out the amazing creations from the Design team too
while you are there - you'll be glad you did!

See you tomorrow with another Christmas creation! 

Saturday, July 4, 2015

My Time to Craft Challenge #299 - Paper Piecing

Hello again friends! 
Hope you are having a fabulous weekend so far!
I'm back again with another DT card to share with you 
for the newest challenge at MY TIME TO CRAFT.
But before I get to that I wanted to tell you that we are
going to a fortnightly (every 2 weeks) schedule 
for the next couple of months. 

Summer time is short (at least here in Montana it is)
and peeps have lots going on, so we thought it would be 
a good idea to switch things up a bit for the summer and  
give us all a chance to enjoy the season a bit more.

So for the next two weeks the theme for MTTC #299 
is PAPER PIECING!  So get out your stamps and those
little scissors and get to cutting and pasting :o) 

Here's my card using a super sweet stamp set called
"Twinkle Twinkle" by Sugar Pea Designs

I paper pieced the comforter, the girl's pjs and the curtains.
I first colored the parts that wouldn't be paper pieced 
(let's just say that I have learned that lesson the hard way 
in the past - hehehe).  Then added the extra parts I had stamped
onto scraps of designer papers by Doodlebug and Stampin Up.

This card is going to my precious daughter.  She's a bit
old for it (15 now) but I still think it will make her say "AWWWW".
She will always be my baby - no matter how old she gets :o).

I used the current sketch - Sugar Sketch Challenge #27
(w/a bit of my own spin)
to make this card so am entering it in that challenge.  
SPDSS27

I'm also entering it in these challenges as well:
The Outlawz Monday Greeting Challenges - Anything Goes (6/29/15)
Addicted to Stamps Challenge Blog  Challenge #151 - Anything Goes
The Pink Elephant Challenges #305 - Anything Goes

The rest of the lovely ladies at MTTC have also made
some wonderful creations to share with you as well.  
Please go visit them and say "hi"!

I hope that you will decide to play along with us for 
MTTC299 - Paper Piecing!  You have until July 17th to enter.
Til next time...hugs and happy crafting! D

Saturday, June 20, 2015

Kraftin' Kimmie Saturday Challenge #285 - TRY SOMETHING NEW

Hi everyone! Welcome to another weekly challenge at 
Kraftin' Kimmie Stamps!

 I get the pleasure of being your hostess for the theme of this week's challenge.
I've been kind of experimenting lately with different techniques and styles
so I thought it would be fun to make my challenge "Try Something New"!
Now don't let that scare you... it doesn't have to be a technique or style.
Your "try something new" could be a new color combo that you might not
have tried otherwise, or a new embellishment (like wood or charms or washi 
tape).  It could also be using a new/different type of coloring medium.
For example, I usually color with copics - but it might be fun to use
pencils or crayons instead.  If you are really not so hot on trying something
new then use a new stamp and make a creation to share with us.  
Not so scary right??!  Just tell us what your "New" is please.

For my "Try Something New" I made two cards using water techniques
(both of which I learned recently from my talented friend Cindi C). 
The first one is made by giving a piece of watercolor paper a good
soaking with a water and dropping candy sprinkles on it to dissolve
(yep, like the kind of sprinkles you put on your cupcakes or donuts).
I used some quite large sprinkles that took a long time to dissolve so
I'd recommend the smaller little hard sprinkles if you try this.
I can tell you though that this smells good enough to eat - LOL!
I used one of the new Itty Bitty Friends stamp set (Clarabelle)
and a sentiment from the "Make A Wish" sentiment stamp set .
I also have a sweet little button and mini doily on this
card that I got from the Kraftin Kimmie Shop.  

I'm entering this card in The Outlawz Challenges
Twisted Thursday - Theme of "Things w/ Wings"

My second card also uses water but this time I gave
a panel of watercolor paper a good watercolor wash
with a large paintbrush and some Rich Razzleberry ink
(from Stampin Up) then I dropped some kosher salt
crystals all over the panel while it was still wet to
let the salt dissolve the color in areas where it sat.
After it was dry (heat guns are awesome for this) I embossed
a sentiment (from the "Words of Inspiration" stamp set)
in black - sadly I got it a little crooked - and then added
a bunch of prima flowers and some black rhinestones and
that amazing button on the largest flower middle.  This is
a different style for me as I don't usually go so dark with my
colors - but I do like how it turned out with the variation of
colors due to the salt.  Hope you like it too!


I hope that you will be joining us this week for the Kraftin' Kimmie Saturday Challenge!
We always enjoy your creations so be sure to submit them so you can WIN
 a $10 gift card to the Shop!! Show us your stuff!!
Now create a card, scrapbook page or altered item with a Kraftin' Kimmie Stamp
 or any other stamp and be sure to use our THEME as a starting point for your
creation! You will have until June 26th at 11:55 pm EST to get your entries in!

Have you joined the Kraftin Kimmie's Krafty Friends fb group??
 It's the best place to keep up with all of the goings on as well as sharing YOUR
creations and getting inspired by other Krafty Friends' creations!!!

If you are looking for a good deal then hear this...
Frugal Friday specials are UP!!!
 There are some awesome KK Stamps on SALE this weekend -
what a great way to work on your wishlist :o)

Thanks so much for stopping by to visit me today.
Til next time...hugs and happy kraftin'! D

Friday, June 12, 2015

Kraftin' Kimmie NEW June Release DAY TWO - Let's Roll Dude!

Hello again friends! I'm happy that you are here 
because it's DAY TWO of the Kraftin' Kimmie Stamps 
NEW Release for June!! 


The featured set for today is called "LET'S ROLL DUDE"
by artist Emilie Goulet.  I often see people asking about where to find
good "guy" stamps.  Well look no further as this is an awesome
masculine/guy set to use for those wonderful men (young
and not so young) in our lives.   This will be available on Saturday
June 13th following the new release party - whoop whoop!

Here's my card to share with you today - enjoy!

I used the bouncing brayer technique to  make my background.
LOVE how it turned out! 

I'd like to also enter this card in the following challenges:
Clear it Out Challenges: Theme/Color Challenge Blue & Stash/Blue embellishments
Crafting for All Seasons Challenge #104 "It's a Boy Thing"
Papertake Weekly - Something for the Boys
Penny's Paper-Crafty Challenges #231 -  Use your Favorite Embellishment
(mine is enamel dots)
The Outlawz - Tuesday Color Challenges w/Twist
(I used blue and green in addition to the orange & twist enamel dots)

Do you have a favorite embellishment for cards?
Mine would definitely have to be enamel dots.
I don't know why but I am just crazy for those things.
The ones I  use here are from the Echo Park Jack and Jill -Boy
line.  Great boy colors!  These are available in the 
Kraftin' Kimmie Store along with the coordinating papers
and lots of other fun things that Kimmie has been adding lately.   

I hope you can join us for all the fun and excitement and prizes 
on SATURDAY beginning at 6pm EST!! Come hang out with the 
Krafty Girls/Guests and Miss Kimmie herself at the
 LIVE ONLINE RELEASE PARTY! It's a fun time 
and you'll be glad that you did!!

Please visit the blogs of the Krafty Girls and Guests who have 
creations to share with you today featuring this fantastic
new set.  Leave some love at each stop to be eligible to 
WIN some Krafty $$ to spend in the Kraftin' Kimmie store. 
See you tomorrow with another peak! Hugs! 

Wednesday, May 27, 2015

Kraftin' Kimmie Wonderful Wednesday - A tiny hello!

Oh hello there - happy Wednesday to you!
It's time for another fun WONDERFUL WEDNESDAY challenge
at Kraftin' Kimmie where it's always ANYTHING GOES!


I'm still playing with the absolutely adorable and irrestible NEW
stamp set called "ITTY BITTY FRIENDS" - take a look:

I tried a new technique (well at least it's new to me)
called bokeh - which means blurred or out of focus background.  
The white dots are like the spots of light you get in photographs that
are over exposed or out of focus.  I used glossy white paper and 
two different blues and a green to create my water.
The bubbles are made with white craft ink. LOVE how it turned out!

Did you notice those wonderful sparkly sequins?  There are lots of
different and fun colors available in the Kraftin' Kimmie store.
Along with a whole bunch of other krafty candy and goodies :o)

I hope that you will decide to join us at Kraftin' Kimmie this week.
We want EVERYONE to be able to play along so your submission 
can use ANY stamp and can be any theme, any style, any design 
and it can be a card, a scrapbook page, an altered item....you name it!!
 It must be a NEW creation and you can enter until June 2nd at midnight! 

I'd like to enter the following challenges with this card:
City Crafter Challenge Blog Week #263 - Sequins
The Pink Elephant Challenges #300 - Anything Goes
Papertake Weekly - Take your Pick (mine is color theme Blue & Green)
House of Cards - May Technique Bohek Effect
Addicted to Stamps Challenge Blog #146 - Anything Goes
The Corrosive Challenge Blog #225 "Anything Goes"

  Til next time sweet friends and followers...
Hugs and happy kraftin'! D

Sunday, May 24, 2015

Bokeh Effect Technique

Hi friends! Popping in quickly to share a card I made last week
with my card group using a new technique (at least to me)
called bohek.  I watched a couple videos and followed the tutorial
by Mynn Kitchen on the House of Cards challenge site to make 
this extremely FUN card.  Take a look: 

I really really enjoyed this technique! I got a wee bit inky
on my fingers but it was totally worth it :o)  I made my own
stencil using a clear window sheet and different size punches 
for the circles.  I just kept rotating it around as I filled in the
different circles with white craft ink.  The other colors I used 
are Melon Mambo, Bermuda Bay and Crushed Curry (all Stampin Up!).
The die cut sentiment is from Stampin' Up, the sequins are from 
Kraftin' Kimmie.  I love how this turned out - it makes me feel happy!

I'd like to enter this card in the following challenges:
House of Cards - May technique - Behek Effect
Happy Little Stampers - CAS Challenge with Die-Cuts/Punches
Seize the Birthday - Anything Goes (no topping)

Thanks for stopping in to visit.  I'm off to spend some time with
my family. Thinking of going to a movie today since it's kind of
cloudy and gray outside today.  Enjoy your weekend! Hugs D

Saturday, November 15, 2014

MTTC #267 - Christmas Decoupage

Hello sweet friends and followers, so happy you're here to visit.
Time for another weekly challenge over at My Time to Craft (MTTC)
MTTC #267 is Christmas Decoupage.
It can be traditional or stamped decoupage.

If you're like me you just said "what the heck is that?".
I had only heard of the version where you glue
paper onto wood with a glossy finish over the top
(that was ages ago when I was a little girl).
Here's a definition of this process that I found:

Decoupage—from the French word découper, meaning to cut out—
is a craft or art form that entails pasting cut-outs (typically paper) to an object 
and then covering with several coats of lacquer or varnish.  
The process gives flat cut-outs the appearance of depth. 

I really wasn't sure how that would work with card making.
But as luck would have it, I was perusing through
a local craft store last weekend and came upon
a Papercrafting magazine that was offering a free decoupage
set and flocking with purchase.  Score!!
It even had instruction as to how to layer the paper images.
Happy dancing - that was me :o)

So...here's what I made using one of the freebie decoupage images
for my DT card for MTTC 267 - Christmas Decoupage

It was really kind of fun to do! There are 5 different layers on this image -
that last one being the arm that is holding the package.
Can you see the spots of flocking that I added as well?
All kinds of new stuff going on here for me :o)

If you haven't tried this technique yet it would be a great
opportunity to do so and enter the challenge at MTTC.
My lovely and talented DT pals have made some really
gorgeous Christmas decoupage creations to share with you
as well. Please go visit them and be inspired!

I am entering the following challenges:

Brown Sugar Challenge #120- Anything Goes
(3 or more layers, 2 designer papers, 1 image)
Love to Create Challenges #141 "Anything Goes"
Jingle Belles - The Great Outdoors

Thanks so much for stopping by to visit. 
Til next time...hugs and happy crafting! D

Sunday, October 12, 2014

Sentimental Sundays Challenge #228 - Buttons (Sponsored by Deedee's Digis)

Hello sweet crafty friends - thanks so much for stopping in to visit me.
I am on the DT for Deedee's Digis and am excited to share
a card I made for a challenge that Deedee's Digis is sponsoring.

The awesome challenge is Sentimental Sundays 
and the Sentimental Sundays Challenge #228 is...Buttons.

Here's what I made to inspire you to play along:

I took a bit a a different interpretation of this challenge and 
added lots and lots of digital buttons using one of the newest releases 
at Deedee's shop called "Goody Jars".

There is a fabulous tutorial on Deedee's blog about layering
digital images to create a look such as this where the buttons are
 placed inside the glass jar.  In addition to the
layering of the images, I also used the re-sizing and rotate tools
to make the buttons different sized and appear as if they 
are laying at different angles in the jar.  This was sooooo
much fun to do.  I could have sat and played for hours :o) 

I used the pre-colored digis for this card which made it very easy
to layer.  I printed the image twice so I could cut out the top
and the peppermint candy and then create a pop-up of those parts
for dimension.  Really love how this turned out - I hope you do too.

I hope that I've inspired you to play along this week at 
Sentimental Sundays Challenge #228 - Add a Button.
The wonderful DT at Sentimental Sundays have made some
terrific creations for your inspiration. Please go visit them and say "hi".
Don't forget...
Deedee's Digis is offering a wonderful prize for this week's challenge. 

Til next time...hugs and happy crafting! D

Saturday, March 15, 2014

My Time to Craft Challenge #239 - Charming (use a charm)

Hello dear friends and followers - so happy you've decided to come visit me today!  Time for another weekly challenge at My Time to Craft Challenge Blog.  For MTCC #239 the DT want to see you use a charm somewhere on your creation.  Here's my Guest Designer card to share with you this fine weekend:

I used a starburst technique that I taught my card group a while back on this card.  It's a great technique to either showcase or use up some of your patterned paper stash.  I wish I could tell you that this paper was from my stash but the truth is I fell in love with the flowered paper when I saw it and then searched to find the perfect image to use with it.  Come on admit it... I bet some of you have done it :o).   The blue jean looking paper is from my stash though so I'm not completely hopeless - lol.  

I hope you will decide to join us this week at MTTC Challenge #239 - Charming.  The MTTC DT ladies have made some gorgeous creations to share with and inspire you. Please take a moment to go visit them and say "hi".  It's always nice to spread a little love don't ya think?  

I am also entering this card in the following challenge:
Creative Card Crew - 57 Charms (use a charm)
Sister Act Card Challenge #57 - Anything Goes

Til next time friends...hugs and happy crafting! D 

Tuesday, March 4, 2014

ATS&M Challenge #85 - Photo Inspiration

Hello friends! Time for another weekly challenge at Addicted to Stamps and More! We have a new guest designer joining us for the next two challenges.  
Welcome to Darnell - we love your gorgeous creations and are happy to have you joining us.  

ATS&M Challenge #85 is a Photo Inspiration Challenge based on this image:


I used the colors and the theme of strong women for my DT card. Take a look please:

This is a skinny card (3 3/4" x 6") as I wanted as much of the panel to show as possible.  I made the main panel by using a watercolor technique.  I pounced 3 different pink stamp pads  (Pink Pirouette, Calypso Coral and Melon Mambo) down on a plastic sheet and then spritzed with water.  Then I placed my watercolor paper over that and kind of mushed it down and around a bit.  I lifted it and then spritzed again and then put it down one more time.  I heat set it and then let it set over night before adding the embossed sentiment (drat - I got it a bit crooked).  Then I used my gorgeous grunge set to add a few extra spots by using Basic Grey (stamped off once first) to the panel.  Really  happy with how it turned out and plan to show my card group this technique later this month.  Messy but fun, and the results are stunning. 

The other lovely ladies on the ATS&M DT have made some beautiful creations to share with you based on the photo inspiration.  A big thank you to Kathryne for being our prize sponsor this week.

The challenge winner will receive 5 digital images of their choice.

Updated to add that I am also entering this card in the following challenges:
Virginia's View Challenge #1 - Watercoloring


and
STAMPlorations Bi-Weekly Sketch Challenge #7 - Sketch
(thanks Nonni for telling me about this).


Thanks so much for stopping by to visit me today! I'm sure glad that you did.  I hope that you will decide to join us this week at ATSM for Challenge #85. Til next time...hugs and happy crafting! D


Friday, January 24, 2014

Bugaboo 4th Birthday Bash - Day #7 Friday Freebie w/ Four, CFC126: Color Blocks and cQc #225

Hello friends.  I have reached the end of the week long Bugaboo 4th Birthday Bash at the Catch the Bug Challenge Blog.   Thanks so much to many of you for coming by my blog each day and leaving me such very nice comments on my cards!  It really made my day to read them all.  Surprisingly I managed to make a card for each day of the challenge and now I have a few more fund cards for my stash.

So for this last challenge in the Bugaboo's Birthday Bash  series, Day #7 is Freebie/Theme.  They wanted to see us use something in fours in addition to the Friday Freebie digi.   As soon as I got home from work I quickly downloaded this fun free image and got busy coloring so that I could make the challenge before it closed.  My element of 4 is the four color blocks.    Here's what I came up with - please take a look:
Details: Cardstock from Stampin' Up - 
Cherry Cobbler, Always Artichoke, Calypso Coral, Chocolate Chip and Whisper White.
Digital image - freebie (1/24/14) from Bugaboo colored with copic markers 
Extras - texture folder and candy dots (SU) for the cherries on the cupcakes

I kept this one quite CAS using a color blocking technique.  The finished card size is 5 1/2 inches square.  
My daughter walked in the room as I was taking the photo and said "oh Mom that's really a cute card".  I love hearing that from her.  Usually she is my biggest cheerleader, but sometimes she can also be my most honest critic :o) 

I'm also entering my card in the CAS-ual Fridays Challenge where they want to see color blocking

and colourQ #225 where I got these fun colors to use
That concludes my short and sweet blog for tonight. Thanks for letting me share my crafty creations with you today and all week.  Til next time...hugs and happy crafting! D