Monday, July 30, 2012

ATS - Sketch #1, Dynamic Duos #13 and Paper Players #106

Hello friends, I'm so glad you've popped in to visit my blog today!  My dear Daddy is going to be 70 in just a few days.  He loves old cars, trucks and tractors.  I purchased this Tim Holtz stamp to use for his birthday last year and then forgot that I had it until his birthday had passed - so I made a note in the calender for this year to "use old car stamp".  Geeze, you'de think the way my memory is I was the one turning 70 (or older!). 

In any event... I found a couple challenges today to help me turn my idea into a card that he will really enjoy.  My card layout is from the sketch by Kylie at Addicted to Stamps - Sketch Challenge #1.  Even though she calls it "a bit unconventional", I liked it the minute I saw it and have several other ideas for what I could do with this sketch (see below).
The colors for this card were inspired by the Dynamic Duos Challenge #13 - Monochromatic (Early Espresso and Crumb Cake) - so perfect for a masculine card, I think, and I also used the Tic Tac Toe board from The Paper Players Challenge #106 (see below). 
I'm pretty sure you can figure out two of the items I used for this card (hint... it's the column on the right).  The favorite color is not mine - I like deep pink, but my dad doesn't - lol, so I used my favorite colour to used for masculine cards - dark brown - which is also so conveniently one of the colors for the Dynamic Duos challenge this time ;o)  I don't really know what my Dad's favorite color is -  he has never said but I know he likes to buy black cars and green tractors.  The punches I used on this card are the curly label and a retired gear punch (both from SU).  I punched the small gears out and then spritzed them with brown to create a rusted look.  


I sponged around all the edges with Espresso ink to age everything a bit (since Old Guys Rule) to match the style (era) of the truck and the age of the recipient (don't you dare tell him I said so - lol!).    Here's a pic of the inside too (the sentiment is from a Fiskars clear set):
Hope you like today's card and thanks again for stopping in to visit.  Til next time - Hugs!!

Holly Jolly Christmas Challenge - Non Traditional Colors

Hello Friends and Happy Monday!  Today I have a CAS christmas card to share that uses some non-traditional colors for the Holly Jolly Christmas Challenge - Show Us Your (Non-Traditional) Colors.
I would say the color combo of yellow, kraft and black are definitely non-traditional, but aren't they fun together?  Not too much to say about this card really as far as technique goes - lol.  It was amazingly simple to put together really.  I layed the letters out where I wanted them and then drew a very thin line so I could stamp "Christmas" where I wanted it to be and then adhered the chipboard stickers, and added three little yellow rhinestones.  The darling hat belongs to the snowman on the inside.  I was afraid that I wouldn't get it right where I wanted it on the card so I stamped it separately and then snipped it out and glued it on the card base above the letter right where I wanted it.  Here's a pic of the inside too:

The hat and snowman are from a retired SU set.  The sentiment on the inside is also from SU from a set called Snow Buddies.  I am delighted with how this card turned out - hope you like it too!   Thanks for stopping by to visit my blog today - I'm sure glad that you did!! Til next time - Hugs to you!

Saturday, July 28, 2012

ABC Christmas - "O for Open it Up". Sweet Stampin and Lollipop Crafts - "Christmas in July".

Hello again my wonderful blog friends!  A second post for me tonight thanks to the time spent today playing in my craft room.  Do you recognize this stamp?  It is the third - yes 3rd - time I have used this set after never using it before - whoo hoo!  It's like I got it out and suddenly went crazy with it and now and wondering why I was ever so intimidated by it.  You may remember that I mentioned that I thought it was too elegant for my typical style of cards - but I have found that it is also great to use with CAS cards as the images really just stands out so much, and so beautifully that I don't feel the need to add a bunch more embellishments to the card when I'm using these stamps.  I apologize for my rambling - I just feel like I've really accomplished something by getting over the neglected (feared) stamp syndrome - LOL.  If you look closer, you might see the red from the second layer peeking through the holes around my raised sentiment.  I didn't plan that, but I sure like how it looks - a lucky crafting accident you might say.  I used a sentiment that is quickly becoming one of my this year's favorites - isn't it sweet? 

Getting on with it now... I made this card to enter in three great challenges.  The first is ABC Christmas Challenge  - "O for Open it Up".  This means they want to see what we did with the inside of our cards too.  Gulp - I'll be the first to admit that often times I will only create the front and go back later to finish the inside (except when I am making it specifically for someone and I'm combining it with a challenge) as often I've expended all my energy on the card front by the time I've finished it that I then feel overwhelmed with what to do on the inside.  Do you ever do that??   I have been trying to be better lately though about finishing them all the way and this challenge helps :o)  Without further ado here is the inside of my card - I kept it clean and simple inside too:
The other two challenges I am entering tonight are Sweet Stampin - Christmas in July and Lollipop Crafts Challenge #84 - Christmas in July.  I am loving this Christmas in July theme as I love to make Christmas cards and it just seems like a perfect time to make them to get a jump on the holiday.  Also, you can think about cooler temperatures when the weather is unbearably HOT outside ;o)

Thanks so much for stopping by once again to visit.  I'm always glad that you did and hope that you left with a little bit of inspiration from me!  If you want some more inspiration go check out the creations that the DTs from each of these challenges have made. Play along too if you are so inspired - its a great way to keep yourself crafting.   Til next time - Hugs!!

Supplies (all from Stampin Up! except oval die):  Cardstock - Always Artichoke, Real Red and Whisper White. Stamps - Bells and Boughs (holly) and More Merry Messages (front and inside sentiments).  Ink colors - Always Artichoke, Real Red,Cherry Cobbler and Black.  I used my blender pen to soften the effect a bit.  Oval die - small ovals from Spellbinders.  Ribbon - Seam binding in Always Artichoke.

Freshly Made Sketches #45, Divas by Design #45 and Stampin Royalty #134

Hello friends - seems like its been a while since I've created and posted a card.   I've been squeezing in some time to visit some of my favorite blogs and continue to be inspired, but haven't had time to get my fingers inky for the past few days.  This past week was a crazy catch-up week for me but  I finally found some time today to play for awhile :o)  and boy did it feel wonderful!

My card today is based on the great sketch at Freshly Made Sketches #45 (see below).  This sketch has so many possibilities with the option to use any shape, but I decided to follow it very closely this time with my card.  I am also entering this card in Stampin Royalty Challenge #134 - Buttons and Divas By Design Challenge 45 - Happy Birthday.
The inspiration for my card comes from my mom and sister who have been talking about how great the cherries are right now (they are crazy for cherries). One of them will most likely be getting this card from me in the near future :o).   While I love cherry pie (my absolute favorite), cherry cobbler, cherry jelly, cherry yogurt (you get the idea...), I don't like to eat cherries just as they are for some reason - go figure!   Anyway -  I've had this fun stamp set called Button Buddies for quite some time but often forget to use it - so I dusted off the case and decided now was the time to ink it up and add a couple buttons.  I remember when I used to be hesitant to use buttons - didn't know where to place them, worried about the heaviness of the card or trouble mailing, etc.  But now I love to add buttons whenever it works on the card.  I have left this set on my desk to remind me to use it more often.  Do you have a neglected set or some buttons to use?  I encourage you to get them out and start playing!! 

Thanks so much for stopping by - I'm sure glad that you did!  Have a wonderful weekend - what's left of it already (how does the time go by so fast?).  Hugs!!

Supplies (all from Stampin Up!):  I used Lucky Limeade cardstock as my base for the card and a piece of retired DSP called Sweet Shop.  The Cherries are from Button Buddies and the sentiment is from one of my go-to sets called "Petite Pairs".  The buttons are from the brights set and the ribbon is the 3/8" Ruffled Pleated Ribbon in Lucky Limeade (sooo easy to work with - love this ribbon).  I used the 2 1/2" circle punch for the main image and colored the stamp with my SU  markers before stamping and adding the buttons.  

52CCT - Embellishment Challenge, Christmas Stampin All Year Round & Merry Monday July Challenge

Hello all you Christmas card loving folks!  Time for another 52 {Christmas} Card Throwdown Challenge.  Since it's the fourth week of the month, the 52CCT Embellishment Challenge #7 is to use brads on your creation.  So how fun is that??  Brads are such a great way to add dimension and depth to your projects.  I chose to add sparkly brads to mine. Pop into the challenge blog and check out what the other design team members have done with brads to provide you some inspiration. You're gonna love it!
In addition to my DT post I am participating for the first time in the Christmas Stampin All Year Round July Challenge which is to include a Christmas flower (holly or poinsettias) on your creation.  And am also still participating in the Merry Monday July challenge which is to make 4 Christmas cards (one each week) based on a past sketch.  My card today uses sketch #16 (see below). 
I just love this sentiment which is from a NEW Stampin Up set called "More Merry Messages".  I used a retired SU Sizzix die called Stocking Accents for the holly and added some glittery brads for the berries in the middle.  I think the result is a fairly clean and simple card but a bit of added depth.  One of the challenges of making a card with several brads is the issue of mailing them (it costs more or they may get torn up).  I don't usually let that stop me though - I just pop it into a padded mailer envelope and send it off.  I figure if I went to the extra effort to make a more special card then I'm not going to fuss about the extra postage. I'd rather it gets there still looking lovely :o) 

Here's another view of the card:
I hope you will join us this week at 52CCT!!! I'm having so much fun sharing my creations with you as a DT member and I am continually amazed at the inspiration that I am getting back from all of you.  I'm so glad that you create and share with us! I try to pop in and leave love notes for as many of you as I can.  Hugs!

Supplies (all from Stampin Up): Cardstock - Old Olive (base), Cherry Cobbler,Very Vanilla, and Garden Green.  Textured embossing folder (perfect polka dots - my all-time favorite).  DSP - Jolly Holiday (retired). Ink - Riding Hood Red.  Stamp sentiment - More Merry Messages.  Glitter brads in Brights (red). 

Tuesday, July 24, 2012

Hugs & Kisses for Mo's DP2 Challenge

Happy Tuesday friends - hope you are all having a wonderful day!  The challenge this week at Mo's DP2 is Hugs and Kisses and they are having a Guest Design Member call too.  I love Mo's images and coloring them with my copics so I thought "why not add my name to the calling".  The samples I see each week from the Design team are just phenomenal - I'm not sure I'm up to their level, but I just might be a fresh face and what an opportunity that would be!!  In any event - win or not - I love to use Mo's images and plan to keep playing along. 

This sweet image is called "Ragged Romeo" -  I used the wonderful sketch from Sweet Sketch #163 for this card (see below).  It's layered, yet fairly clean and simple style just seemed right up my alley :o).  I didn't participate in the challenge this week but loved the sketch. 
So... thanks very much for stopping by to visit me today.  Going to be a bit short today in my post as my son wants to drag me up the mountain (aka hike) to see the sunset tonight.  I love to get your wonderful comments on my creations so please leave me a note if you've visited.  Til next time - Hugs (and kisses)!!

Supplies (all from Stampin Up except digital image by Mo Manning):  Cardstock - Pretty in Pink, Real Red and Whisper White.   Digital Image - Ragged Romeo by Mo Manning at Mo's Digital Pencil (colored with Copic markers).  Sentiment - from Petite Pairs.  DSP - Lap of Luxury (retired).  I used the small heart and small oval punches and Adorning Accents textured embossing folder (hearts) on this card.

Saturday, July 21, 2012

PPA139, Paper Play Challenges and Simply Stampin Challenge

Happy Saturday friends!  Thanks so much for stopping in to visit me - I'm sure glad that you did!  Hope that you are having a fine weekend! 

This card is based on the great sketch this week from Pals Paper Arts #139.  I just loved all the different strips to use my patterned paper with and the fun circles at the corners (I immediately thought buttons for some reason).  Here's the sketch:
PPA139
I'm also entering this card in the following challenges for the first time:  Paper Play Challenges Week 29 - Christmas in July, and Simply Stampin Challenge #69 - Vintage.  I love to make Christmas cards and Vintage and Shabby Chic is a style that I want to practice more as I really admire it.  I really like how this one turned out - it does seem that the more you practice something the more comfortable you become with it (of course a great sketch and stamp help a lot too - lol).  Here's a couple more views of this card:

I'm delighted to share with you that this card is that second one I've made with a stamp set that I had previously never used. You might remember that I had made a card a few days ago with one of the other stamps from this set that I've had for ages but had not been able to envision how to use it. Seems that once I got over that "block" I can now see other uses for this set :o).

I found these new challenges by following the blogs of a couple talented ladies. I saw their cards for these challenges and was so inspired that I had to give it a go too. This is all part of the fun of sharing our creations on our blogs and entering challenges. It would just tickle me pink if I inspired some of you sometime to try a new challenge or technique or product :o).  So let's get on to the details in case you are wondering what I used for this card.  Til next time - Hugs to all of you!

Supplies (all from Stampin Up!): Cardstock - Riding Hood Red, Very Vanilla and Early Espresso.  Stamp - Bells and Boughs, colored with my SU markers in Old Olive, Always Artichoke, Cherry Cobbler and Summer Sun.  DSP - Deck the Halls (retired).  Buttons from a retired stash and natural hemp twine. 

52 {Christmas} Card Throwdown - Theme challenge #7

Hello friends!  Here it is the 3rd week of July and that means that the Design Team at  52 {Christmas} Card Throwdown has a Theme challenge for you.  Can you guess by my card what that theme is?  Yep ... you guessed it - wreaths! Here is the inspiration photo for the challenge:
I decided to try something a little different from my usual style and do some distressing.  I love this when I see it from other people but this is not usually my first technique of choice as it seems that when I try it, it comes out looking "dirty" instead of distressed - LOL.  But, the style of the DSP seemed to be leading me in that direction so I decided to give it a go and see how it ended up.

I first added pearls around the edges of the main DSP area.  Then I rubbed some Cherry Cobbler ink around the pearls and paper to "age" both a bit. This photo doesn't do it justice at all - I had a dickens of a time getting this to photograph well - argh! Here is a closer view of the details - hope this is a bit better.
I ran the card base through my Big Shot with the poinsettia textured folder and then distressed the card base with Always Artichoke ink.  I also sanded it a bit after the ink dried to give it some more "distressing".  The felt wreath also got a shot with the Always Artichoke ink to tone down its brightness just a tad (but I still wanted it to stay the focus of the card).  After stamping and centering the sentiment behind the inside of the wreath I sponged some Always Artichoke around the word.  Here's another close up:
And then it was complete -  and I stared at it forever trying to decide if I liked it - hmmmm... Yep, I like it.   Not sure that I'll do it lots, but I think with practice I'll be more comfortable with it.  Thanks for letting me share with you.  Hope you like it!

Please  visit the 52CCT challenge blog and see the wonderful creations the rest of the design team has created for your inspiration this week.  I hope that you will share your amazing creations with us as well! It's a delight to see what you come up with each week - I always find new inspiration from you too.  If you want, leave us a note and make sure you link your post back to the 52CCT blog so that others can share in the fun!  Hugs!

Supplies (all from Stampin UP!): Cardstock - Cherry Cobbler, Always Artichoke and Very Vanilla.  Textured Embossing Folder - Petals-A-Plenty. DSP - Deck the Halls (retired). Felt wreath (retired). Sentiment - I colored just the word Merry from a sentiment that says "Merry Christmas" in the More Merry Messages set (NEW).  Basic pearls - lots of them :o)

Friday, July 20, 2012

Divas By Design - "Anything Goes"

Happy Friday Friends!  Right now I am living in the sunshine but  it looks like that might change as there are some big black clouds brewing to the west and we are supposed to get some hefty afternoon showers.  That's been happening quite a lot lately here - sunny in the mornings and raining in the afternoon and evenings - good for the lawn and trees, bad for me and the weeds I have to pull - LOL.  Ok... so enough of the weather report and on to the card you are seeing above.  I was messing around with this card last week for a color challenge and but didn't get it finished.  This morning I saw that the theme this week at Divas By Design Challenge #44 is "Anything Goes" so I thought I'd finish it up and share it with you as I enter this challenge. 

I stamped the flower image on a piece of Daffodil Delight cardstock using More Mustard ink for the darker effect, then I put it in my Blossom punch.  I ran the leaves through a textured embossing folder after I punched them out.  The sentiment is layered with two offsetting ovals with some some brown pearls for added emphasis.   Hope you enjoyed today's card and that there is some sunshine where you live to enjoy!  Thanks so much for stopping by to visit - I'm sure glad that you did! Hugs!

Supplies (all from Stampin Up except as noted):  Cardstock - Early Espresso, More Mustard, Daffodil Delight and Pear Pizzazz.  DSP - Spice Cake (retired).  Stampes - With Love and Care; flowers (retired hostess set) and Pursuit of Happiness sentiment.  Textured Embossing folders - Manhattan Flowers (leaves) and Square Lattice.  Punches - Blossom (flowers) and Blossoms Petal Builder (leaves).

Thursday, July 19, 2012

Technique Tuesday - Cascading Card and Our Creative Corner Color Challenge

Hello friends - here it is Thursday already - Wow, where has the week gone?!  This card is a first for me - as it is the very first time I have made a cascading card!! Okay so I got a little overly generous with the hearts but I'm soooo excited that it turned out!  It wasn't as hard as I thought it would be thanks to the wonderful step by step tutorial by Mynnette at Technique Tuesday.  Honestly the hardest part for me was figuring out how to get the slots together - I'm kind of technically challenged that way - LOL!  Here are some more pics of this from different angles. 


This is what it looks like when it is laying flat - the overall finished size is 4" x 7" so it will fit in a 5x7 size envelope. 
So Mynnette, my dear, this one is for you!! Thanks for pushing me outside my box with your fun  Technique Tuesday- Cascading Card Challenge!  Hope you like this as much as I do! 

I'm also entering this card in the Our Creative Corner Color Challenge because I used the colors for their challenge of Pink, Navy and one other color of your choice.  My colors are Pretty in Pink, Night of Navy and Regal Rose - isn't it a lovely combo?  I'm sure to use this color combo again and again. 
 

Thanks so much for stopping by to visit me today - I'm sure glad you did!  If you would like to try this cascading card challenge, I would recommend that you pop into Technique Tuesday and follow the great tutorial that Mynnette has put together for you.  I'm sure she would love to see what you create with it!  Til next time - Hugs!!

CAS - One Layer Card for 4 Great Challenges {Tumbling Cupcakes}

Hello friends, the theme this week at many of the challenges I'm playing along with is Clean and Simple (CAS).  I've mentioned before that this is not an easy style for me and that is precisely why I am yet again entering in some of these challenges - to help myself grow creatively.  I made this card for 4 great challenges - three of which I am participating in for the first time. 

The first is Less Is More Week 76 - One Layer Challenge which is to make a one-layer card using 3 of something on your card. A One-layer card is defined as:  "One piece of card folded in half with no additional layers and minimal embellishments, where the image is stamped or printed directly onto the cardstock".   My 3's are 3 cupcakes, 3 frames, and 3 words - oh and I used 3 rhinestones on each cupcake :o).

The second challenge CAS-ology Week#2 (a new challenge centered around the CAS concept using a word or words to spark creativity).  The word for CAS-ology #2 is "Happy".  I'm pretty sure you have already figured out how I have met this challenge - LOL.  What is happier than cupcakes and birthdays?
And the third "new to me" challenge is Clean and Simple Stamping.  The design for my card is based on the CAS FTL #199 (see below) which I have used a tumbling line of three elements instead of in a straight row.
The fourth challenge is a familar favorite called Dynamic Duos which has a subtles theme for this week.  The color combo for Dynamic Duos#11 is  Pink Pirouette and Baja Breeze.  I saw this darling baby quilt set yesterday that had cupcakes on it in these very same colors - it was so cute and  inspiration struck!
Here's a few more photos of this card:  first a close up of those sparkly cupcakes -  
And then the inside (Those circles are on there because I accidentally put an inky finger down and made a smudge that I had to disquise - thus the circles) -
Thanks so much for stopping by to visit me today - I'm sure glad that you did!  Hugs!

Supplies (all from Stampin Up - except frame stamp): Cardstock - Whisper White. Classic ink - Baja Breeze, Pink Pirouette and Soft Suede (neutral).  Stamps - Create a Cupcake, Fabulous Phrases (happy).  Frame stamp is from Verve in the set called To the Moon.

Tuesday, July 17, 2012

Paper Players #104, Christmas Stampin All Year Long #19 and Addicted to Stamps


Hello friends - so happy you've stopped by to visit me!  This card above represents a real challenge for me as you will see when you read more.  I used a stamp that I have had for quite a lonnnggg time and never - that's right NEVER - used.  In fact - I have only used the sentiment from this set and none of the other beautiful stamps.  I really liked this set as soon as I saw it, and I saw so many gorgeous creations that people made with it that I just had to have it.  Then when I got it I felt completely intimidated with what to actually do with with it!  Does that ever happen to any of you? I think part of it is that this is a very elegant set and most of my cards are not in the "elegant" venue. 

In any event... along comes this perfect challenge to help me - Christmas Stampin All Year Long #19 - No Inky Yet!  This challenges asks us to use a stamp that has never been used (or rarely been used) and get it inky to make a creation.  How perfect is that? I knew immediately what stamp set I would use.  But...I sat and stared at it for the longest time, struggling with what to do with it. Walked away from it for a day and then decided that I wanted to keep this as clean and simple as I could so I wouldn't be overwhelmed with what to combine with it (paper, embellishments, layout, etc.).  Clean and Simple does not come naturally to me either - but it seemed like a good choice.  A couple days later... Still looking at it and still creatively blocked!! 

So today I looked to see if there were some other challenges that I could combine to help inspire me in using this set.  And...lucky for me I did find two other challenges:  The Paper Players #104 - CAS using words as the focal point of your card (a sentiment, poem or verse as the main element)
and Addicted to Stamps - Clean & Simple (CAS) Challenge #1.  Suddenly the light bulb came on and I got an idea (LOVE when inspiration strikes!).  What you see above is the finished product - Whew!! 

If you are still with me, here's a close up of my sentiment and main element:
I first colored my stamp with SU markers (twice) and stamped in each corner, then I pulled the color out on the leaves and berries using a blender pen.  I stamped the sentiment and then used my Spellbinders small oval to cut it out.  After positioning it where I wanted it on the card, I then used the coordinating Spellbinder large oval and punched holes around the outer edge of that die.   I did manage to keep it CAS with lots of white space and minimal  layers and embellishments (just a few small red rhinestone berries).  You might have thought by now that you would have just chosen another stamp - I thought about it, believe me, but I really wanted to see if I could do it.  I'm so proud of myself - I kept it CAS and I used an elegant stamp that I have been intimidated by for quite a while!  Hope you like this card - and thanks for staying with me during this long post!  Hugs!!

Supplies (all from Stampin Up! except the Spellbinders): Cardstock - Whisper White, Cherry Cobbler and Riding Hood Red.  Stamp - Bells and Boughs (holly), colored with SU markers in Always Artichoke and Cherry Cobbler, and More Merry Messages (sentiment - new!) inked up with Cherry Cobbler. 


MOJO250

Hello friends!  Do not adjust your monitor... there really is that much blue on this card - LOL! If you read down below you'll see why I chose to use blue. 

I LOVED the sketch this week from MOJO Monday 250 with all its wonderful layered elements and just had to use it for this card.  I did take a couple small liberties with the sketch by adding a couple extra elements - top flower and extra flower on side to help balance out the blues used and bring in the border a bit.  I used the Bitty Banners Framelits to make two banners and then snipped them in half for my four flags at the bottom.  Those little flags at the bottom were not easy to line up - I got that last one a bit off (in fact as I look at this everything is a bit too far to the right -  so just don't look too hard and you won't notice - wink,wink).

There is a newer challenge called Addicted to Stamps (the name alone made me want to check it out :o) ). I participated in their very first challenge and the challenge this week Addicted to Stamps {BLUE} Challenge #1 is to make a creation using BLUE - so I complied and used LOTS of different blues :o) - I used pacific point, midnight muse, not quite navy, night of navy and island indigo.  However, I missed the deadline for this challenge due to an incorrect time zone conversion on my part.  It said by Tuesday 11:59pm so I thought I was ahead of the deadline.  I missed the part about AEST for the time zone.  Have to be more careful next time.

Thanks so much for stopping by to visit - I'm sure glad that you did! Hope you saw something that inspired you today! Hugs! 

Supplies (all from Stampin Up!): Cardstock - Pacific Point, Whisper White, and Midnight Muse.  DSP - International Bazaar (new) and Patterns Designers Series Paper Stack (striped navy, regals collection). Sentiment stamp is from Pursuit of Happiness.  Punches used - Boho Blossom (bright blue flowers), scallop circle punch (dark blue) and 2 1/2" circle punch (sentiment).  Sizzix Framelits - Bitty Banners (small flags at the bottom).   I layered a paper daisy on top of the scallop circle punch and added a designer printed brad (island indigo) to the middle.

Create 4 Fun Color Challenge 58 (CR84FN58)

Hello friends - happy Tuesday!  I am participating for the first time in the CR84FN Color Challenge which calls for Yellow, Red and a Neutral.  My yellows are So Safron (card base) and Daffodil Delight (sunflower) and my Red is Cherry Cobbler.  My neutral is Early Espresso.  Here is the inspiration photo from CR84FN 58:
I took inspiration from the big flowers in the photos to make my card.  I wanted to try a distressed look for a friend who loves that style, so I roughed up the edges and curled a few corners with my paper piercer.  I also added some ink on top of the embossing and a little around the main image as well as some "splots" of color (maybe a bit too many??) using my color spritzer tool and an Early Espresso marker.   This is not my usual style but it was fun to make.  My husband came up to my craft room as I was roughing up the edges and said "you look like you're having fun." (I really did Create 4 Fun!).  I think my friend will like it. Hope you do too!  Thanks for stopping in to visit me today - I'm sure glad that you did! Hugs!

Supplies (all from Stampin Up!): Cardstock - So Safron, Whisper White, Cherry Cobbler, Early Espresso.  Stamp - Sunflower and Petite Pairs (sentiment).  Ink colors - Daffodil Delight, Cherry Cobbler and Early Espresso.  Circle punches - 1" and 1 1/4".  Textured Embossing Folder - Argyle (new).  Buttons - Naturals designer buttons (new).

Monday, July 16, 2012

City Crafter Challenge Blog Week 117 {Recipe Card}


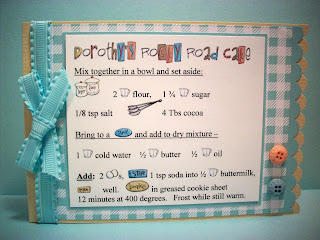
Hello again friends - a second card to share with you today.  This is kind of a special one though because it is a recipe card.  The challenge at City Crafter Challenge Blog, Week 117 is to make a recipe card and I was all over that!  I had someone ask me for this recipe a couple of weeks ago and I told her I would write it down and send it to her.  Won't she be surprised to get this in the mail instead? 

This is a family recipe from my Mother-in-law, Dorothy, that has become an absolute favorite around my household.  It is the most requested birthday cake and my husband loves to make it.  Unfortunately my kids never knew Grandma Dorothy as she passed away when my son was only 3 months old - but every time we make it we talk about how fun and wonderful Grandma Dorothy was.  I'm so happy to share this recipe with you as well!  This makes a sheet cake - not a layer cake, and it is a dense and moist cake that is to die for!!   Before I get to the details I'd like to share some more views of this card. 

The recipe continues on the inside with the frosting recipe for the cake:
And here's a look at the side - you might be able to see how the bottom layer (or inside) of the recipe card shows a bit more:
And finally... here is what the card looks like as you are holding it (or looking at it when it is laying on the counter (not the best picture - sorry):
Thank  you ladies at City Crafters for giving me the fun opportunity to put together this card (and to share with others)!  And thank you if you have popped in to see my card - hope that you liked it.  Let me know if you try this recipe :o)  Hugs!

Details - finished size is 4x6.  Aside from the cardstock and embellishments, this card is all digital.  I used some digital images and alphabets that I've had for a long time called in the Kitchen (I think I got most of them for Lettering Delights ages ago).  All my other supplies are retired stash from Stampin Up (except the ribbon - its still current).